 Tuning
NNM Servers Tuning
NNM Servers
Thirumalainambi Murugesh
Hewlett-Packard's (HP) OpenView (OV) Network Node Manager
(NNM) is a powerful platform for enterprise-wide IP network management
based on SNMP standards. NNM performs auto-discovery of TCP/IP networks,
displays network topologies, correlates and manages events and SNMP
traps for root-cause analysis, monitors network health and alerts
based on configured thresholds, and collects performance data. NNM
manages heterogeneous switched layer 2 LAN environments as well
as routed layer 3 WAN environments. It always helps to have more
RAM, faster disks, and faster CPUs when facing system bottleneck
issues; however, not everyone is ready to spend money for new hardware.
Instead, administrators want to get more out of what they already
have. In this article, I will share some techniques for getting
more out of NNM.
Analysis Tools
When the system behaves slowly, system performance analysis tools
such as glance, top and perfview can be used to analyze the performance.
With these tools, you may see that the processes taking most of
the CPU and memory are from NNM, including ovrequestd, snmpCollect,
ovcoltosql, and ovdbrun. You can then view how those processes are
behaving in detail by choosing the process id and following its
threads (see Figure 1).
Looking at the OV processes in detail with /opt/OV/bin/ovstatus
-v gives the following stats for netmon and snmpCollect. You
can get more information on netmon.trace by issuing netmon -a12
or netmon -a16 for netmon and SNMP polling statistics:
object manager name: netmon
state:               RUNNING
PID:                 19976
last message:        Initialization complete.
exit status:         -
additional info:
09:28:30 Polling 2717 interfaces, 14143 polls/hour. 0 overdue
polls, current maximum 0 seconds behind. Worse was 71 polls a m
aximum of 33 seconds behind at 02/25/03 02:03:04. 74% interfaces
available. 477 Name Service requests, average 3.2 msec/lookup.

object manager name: snmpCollect
state:               RUNNING
PID:                 25535
last message:        Data Collector has been busy for 10896 \
                     seconds (Behind on Polling)
exit status:         -
additional info:
09:29:17 Collecting on 130 nodes, 24562 total instances.
Stored:1149617, Thresh:308, Rearm:294, Sent SNMP PDUs:127771,
Recvd Instances:4724716, SNMP retries:70870 since Fri Feb 21
01:46:19.2 2003 (4.32 days). Collecting 618 variables/minute via
19 PDUs/minute. Maximum collection delay 30920 seconds at
02/21/03 10:28:06. 81 collection checks in progress
You can plot the netmon and SNMP performance from the OpenView Internet
map menu [Performance]->[Network Polling Statistics] and see whether
any of the graph plotting seconds until the next status/SNMP poll
has gone negative, which indicates a problem and requires tuning (see
Figure 2).
You should check the ovcoltosql process. If that process is running
over a long time, it indicates issues with the size of snmp data
collection and solid db. In this case, check the configured NNM
reports and solid.db size located under /var/opt/OV/share/databases/analysis/default.
The maximum size of a solid.db can be 2 GB. If it is nearing that
maximum, it needs trimming and importing and exporting the data
to resize the solid db.
If NNM is struggling with name resolution, it will send two alarms
of type "OV_NS_PerformWarn and OV_NS_PerformErr", and
if it is struggling with SNMP data collection, it will send an "OV_DataColl_Busy"
alarm. If there are any errors with NNM data warehousing, it will
send an "OV_dataWareHouseMaintError" alarm to the alarm
browser. These alarms give a clear indication of issues with NNM
and mean that tuning is required.
You can run /opt/OV/bin/ovtopodump -l and compare the number
of required managed nodes to the number of currently managed nodes.
Currently, the managed nodes list can be printed using /opt/OV/bin/ovtopodump
-RISC. If the difference is high, clean up unwanted nodes to
reduce system loading.
Factors Affecting NNM Performance and Possible Workarounds
1. Physical characteristics of NNM server and its network
2. Nodes management and filters
3. NNM polling
4. Events and Event Correlation System (ECS)
5. Name resolution issues
6. Data collection
7. NNM daemons (ovwdb, ovrequestd, ovtopmd)
8. Number of running ovw sessions
9. NNM data warehouse issues
10. Performance enhancing scripts
Physical Characteristics of NNM Server and Network
Because NNM processes are memory and swap intensive, it is always
better to have more RAM, faster physical disks, CPU and high-bandwidth
lines. You can monitor the system's performance in terms of
swap, memory usage, cpu usage, disk I/O, run queue load using swapinfo,
dmesg, and sar with the available various flag options. In cases
where it is not possible to upgrade with better hardware due to
budget limitation, you can try to tune the system kernel parameters
(e.g., maxusers, process priority, MAXTSIZ, maxswapchunks, and max_thread_proc)
and keep swap partition disks away from file system disks. The tuned
32-bit kernel parameters for better performance should meet or exceed
the values given in Table 1. For a complete overview of HP-UX 11.x
kernel parameters, refer to:
http://docs.hp.com/hpux/onlinedocs/os/KCparams.OverviewAll.html
You might try to adjust the process priority value either using nice
before starting the program, or using renice with the process
id of OpenView processes. Note that the process priority value is
given through the nice number from 0 to 39 with default value
for every process as 20. A nice value of 0 is the highest priority,
and a value of 39 is the lowest. You can check the current nice
number against any program by running the following command and looking
at the value under NI column:
Ps -efl |cut -c 1-37,85-110
Nodes Management and Filters
If you don't control the number of nodes managed by NNM by
stopping the auto-discovery option, it will pick all reachable nodes
whether you are interested in managing them or not, and will fill
up the OpenView operational (object, topology, and map) databases.
This will lead to waste of system resources (memory, swap/paging,
CPU, network bandwidth, filesystem disk space). To effectively manage
the nodes you are interested in, you need to configure discovery,
topology, and map filters, which are defined in the filter configuration
file (/etc/opt/OV/share/conf/C/filters). Before applying the filter,
you should always check the syntax and validity of the filter using
/opt/OV/bin/ovfiltercheck /etc/opt/OV/share/conf/C/filters.
Once the filters are checked for syntax, they can be applied effectively
for nodes management. To ensure that nodes you are interested in
are being managed and that unnecessary nodes are not in the databases,
you can run the following:
/opt/OV/bin/ovtopodump -l
And, you can verify the number of managed nodes with the number of
nodes with the following:
/opt/OV/bin/ovtopodump -RISC |grep -v "/"
This gives the list of nodes managed by the NNM server. From here
you can determine which nodes are missing and which need to be removed
from current management. Once auto-discovery is disabled and filters
are enabled, you can add nodes in a controlled fashion using loadhosts
as shown:
Snmpget -c <RO_community_name> <node_name> \
  ip.ipAddrTable.ipAddrEntry.ipAdEntNetMask.<mgmt_ip_of_node>
This command gives the subnet mask for the node with the management
IP address.
Next, add the node entry for polling in the snmpconfiguration
file using xnmsnmpconf:
/opt/OV/bin/ovstop netmon

loadhosts -p -v -m <subnet_mask_found from step i> << EOF
IP address	node_name
EOF

/opt/OV/bin/ovstart netmon

nmdemandpoll nodename
NNM Polling
By default, NNM does the status polling of nodes configured in
SNMP configuration binary file using /opt/OV/bin/xnmsnmpconf
with the parameters (status polling interval, timeout, and number
of retries) for the list of nodes to be managed. The default polling
interval is 5 minutes (300 seconds) for each device. If you use
the wildcard character (*) for an entire segment (e.g., 10.1.1.*),
even though you are interested in managing few nodes only in that
segment, NNM will try to poll all the possible devices starting
from 10.1.1.0 to 10.1.1.255 within the 5-minute interval. You can
determine the packets per second generated for a status poll using
the following formula:
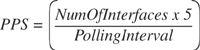
The wildcard character will load the NNM polling and chew up the
system resources. Hence, NNM will fall behind in the polling cycle
due to the number of retries for each failure and the round-trip
time for each polling. A high incidence of pairs of node down/node
up events is usually an indication of a busy LAN with overly frequent
polling intervals or timeouts too short. To avoid this situation,
don't use the wildcard character. Instead, you can add multiple
devices using range values (e.g., 10.1.1.0-25, 10.1.1.42-59). You
should also group critical devices with shorter polling intervals
and use longer polling intervals for less critical nodes. Unwanted
nodes should be unmanaged and removed totally from all OpenView
operational databases.
Besides status polling, the following other types of NNM polling
also load up the system:
- Device discovery polling (IP discovery polling varies from
1 minute to every 24 hours and IPX discovery polling for every
6 hours) for discovery of new nodes from the information of any
particular node.
- Topology configuration polling for every 4 hours.
- Device configuration check polling once a day for every managed
node.
- Collection station status polling from the management NNM server
to NNM collection station once for every 5 minutes.
To avoid the above NNM polling loads up the system, you should
define efficient NNM filters and place them in operation.
Events and Event Correlation Systems
NNM receives events from the managed nodes in the form of SNMP
traps or self-created alert messages for missed polling on a managed
node. When a core router goes down, it generates a huge number of
alarms for unreachability of the entire number of devices managed
down through the path of the core router. When a flood of alarms
hits the NNM server, it will cause a system resources bottleneck
and overflow of buffer, etc. To avoid this flood of alarms, NNM
comes with the following standard Event Correlation System circuits:
- ConnectorDown
- MgXServerDown
- Pairwise
- RepeatedEvent
- ScheduledMaintenance
These circuits can be modified using ECS configuration Graphical
User Interface (ECSGUI) to suit your needs to suppress unwanted
alarms. Once modified, it is always best practice to test them with
the verify option for syntax checking before turning them ON. You
can simulate the required SNMP traps using "snmptrap"
for any enterprise-specific event and use the following syntax to
check the ECS circuit in real-time simulation:
$SNMPPATH/snmptrap -v 2 <NNM_Station> <SNMP_Community_String>   \
  .1.3.6.1.4.1.11.2.17.1 <Node_Name> 6 58916874 0 .1.1 i 1 .1.2 \
  s <Node_name> .1.3 s "ECS_MSG_CHECK".
Also, it is good practice to run confidence tests on ECS using /opt/OV/bin/ecsconftest
with runtime options and to check the log "/var/opt/OV/tmp/ecsconftest.log"
for any alerts.
By default, the event database size is 16 MB. The event database
is divided into four files, which means that each file has a maximum
size of 4 MB. When all four files are full, the oldest log is truncated.
This sends an alert in the NNM alarm browser, and new events are
written into the reclaimed space. If you want to change the size
of the event database to hold more events, use the "b"
parameter in the /etc/opt/OV/share/lrf/pmd.lrf file. Most NNM administrators
periodically upload the NNM events into NNM data warehouse using
/opt/OV/bin/ovdwevent -export for various forms of reporting.
Name Resolution Issues
NNM performance can be drastically affected or improved by name
resolution. NNM issues simple gethostbyname() and gethostbyaddr()
calls to the configured name resolver (DNS/NIS/hosts). Netmon, trapd,
and SNMP data collection processes will be affected if there are
name resolution issues on the NNM server. Netmon monitors name resolution
performance and generates an alert if it finds poor performance.
In a Unix system, the name resolution order is set in /etc/nsswitch.conf
file, and in Windows it is set in the registry settings "DNSPriority,
LocalPriority, HostsPriority, NetbtPriority" under \My Computer\HKEY_LOCAL_MACHINE\SYSTEM\Current
ControlSet\Services\TCPIP\ServiceProvider.
If you use local hosts file for name resolution and the file is
long, it will add a delay because the search is done in sequential
order. If we use DNS, the name server responses can be affected
by network latencies. In Windows, it is always better to turn off
WINS resolution and NETBIOS over TCP/IP.
NNM 6.2 contains several DNS performance enhancements compared
to the previous versions of NNM. NNM6.2 has another database related
to name resolution called "No Lookup cache", which stores
names of nodes, segments, and networks whose names should not or
cannot be resolved to an IP address using the system IP name resolution
services. NNM administrators can also add a mutually exclusive function
file called "ipNoLookup.conf" with IP addresses that should
not be resolved to hostnames under $OV_CONF directory. The "no
lookup cache" is populated by the netmon process during discovery,
but NNM administrators can add and delete entries to the cache using
the following commands:
Snmplookupconf -add <hostname>
Snmplookupconf -load <filename>
Snmplookupconf -disable <hostname>
DNS lookups can be traced with the following command:
Export OV_NS_LOG_TRACE="<Trace directory>;<Log Threshold>;<Trace level>"
Export OV_NS_LOG_TRACE="/tmp/dns.trace;1.0;3"
Running the local caching server on the NNM station is recommended
for better name resolution performance.
Data Collection
Misconfigured SNMP data collection always puts a huge load on
the system. Data collection status can be quickly checked by running
ovstatus -v snmpCollect. On NNM, SNMP data is collected either
to display the health status of managed nodes through Service Information
Portal (SIP) health dials or to produce standard NNM reports. You
can work out the system resource requirements based on the calculations
given in "Reporting and Data Analysis with HP OpenView Network
Node Manager". The main factors include the average number
of instances, the number of MIBs collected on, and the number of
nodes collected on. The current list can be displayed by running
the following command:
/opt/OV/bin/request_list schedule
snmpCollect saves the configuration for each datacollection and data
in the collection directory /var/opt/OV/share/databases/snmpCollect.
The configuration files ends with !. The data is stored in binary
format and can be read using /opt/OV/bin/snmpColDump. The directory
grows as long as you keep collecting data. To control the growth of
the data collection, consider the following:
- Reduce the rate of disk fill by increasing the SNMP data collection
interval.
- Set up cron to periodically trim the SNMP historical data.
Listing 1 shows a small script that can be put into an hourly
cron job to keep only the last 2000 entries in snmpCollected data
files. The script is smart enough that it won't alter the snmpCollect
configuration files.
Currently, snmpCollect tries to query sub-interfaces and tries
to collect from non-existing interfaces. This results in a huge
number of repetitive timeouts and access denied for requested variables
on the sub-interfaces, which can be verified with "/var/opt/OV/share/log/snmpCol.trace"
file. This will load the system and affect system performance. HP
knows these issues and there has been an enhancement request logged
with HP Labs. You can view this online at:
http://OpenView.hp.com/sso/ecare/getsupportdoc?docid=8606274911
http://OpenView.hp.com/sso/ecare/getsupportdoc?docid=8606288412
Follow the link to "email me" if you want to be notified
by email once the issue has been resolved. To work around this issue,
you may need to specify the list of instances using a file instead
of selecting "All instances" by default while configuring
performance reports (see Figure 3).
NNM Daemons
Most of the NNM daemons have various flag options for running
and troubleshooting. The flags can be passed on to the process either
by stopping and restarting with the flags or modifying the local
registration file (lrf) file in /etc/opt/OV/share/lrf/NNMDAEMON.lrf.
For example, if you don't want netmon to poll the nodes for
HTTP server port, add the flag -H 0 in netmon.lrf, which will reduce
system load by stopping http discovery. After modifying it, you
must compile and submit the script for startup with /opt/OV/bin/ovaddobj
/etc/opt/OV/share/lrf/netmon.lrf.
If the total number of objects in the OpenView database can be
loaded into memory, it will enhance many OpenView operations. This
can be achieved by finding the number of objects in the OpenView
database using /opt/OV/bin/ovtopodump -l and modifying $OV_LRF/ovwdb.lrf
with a value of (number of objects + 10%) using the -n option. If
the value is higher than available physical memory, it will defeat
the purpose and cause excessive swapping/paging. Similarly, if you
want to enable tracing with verbose mode on snmpCollect, you should
alter snmpCollect.lrf file as shown and look at the trace file snmpCol.trace
logged under /var/opt/OV/share/log:
OVs_YES_START:pmd,ovwdb,ovtopmd:-d -T -V:OVs_WELL_BEHAVED:20:PAUSE::
You should be very careful in terms of using the various options in
the startup file, because excessive logging and tracing will affect
system performance.
Number of Running ovw Sessions
If you have a big OpenView database, a highly customized map with
lots of background graphics, and multiple users running various
ovw sessions with different maps at the same time, it will put a
huge load on the system in terms of CPU and memory due to IPMAP
synchronization. Also, if you are running ovw sessions over a long
time, they will create a memory leak problem. If all the maps are
persistent, this will add more load in terms of system memory.
To save memory, you could enable the on-demand feature. This feature
enables you to decide which level of submap (All submap, Segment
level, Network level, Internet level) must be loaded into the system
memory during the ovw session. The submaps below that level will
then be created from the available topology database on demand.
You can also limit access to the OpenView database and open an ovw
session by placing the appropriate host names and user names in
the file "/etc/opt/OV/share/conf/ovwdb.auth". The format
is:
<hostname> <username> = To give access
<hostname> - <username> = To deny access
If you use + +, it will give access to anyone from any host. The search
is done in sequential order, so if you want to deny some users, the
entry must be on top. You can also restrict people running too many
maps by granting permission to certain maps to certain people using
ovwperms.
NNM Data Warehouse Issues
If the data warehouse is kept in solid, it is better to check
and maintain properly so that the size of the database doesn't
reach the maximum of 2 GB defined in the /var/opt/OV/share/databases/analysis/default/solid.ini
file. If it exceeds this limit, you risk database corruption, and
running sql scripts (ovcoltosql) to export data and produce reports
will be extremely slow. It is better to trim the data and to export
with reduced option than raw data. When we export the data to the
NNM Data Warehouse, we can export either as raw data or consolidated
compressed format using the reduced option. It is always better
to export with the reduced option as it saves space.
Note that the solid database does not reduce in size when you
trim it; it grows. When it is trimmed, it simply gathers unused
spaces but does not reduce the space. If the solid database has
exceeded its limits, it is better to unload the data using /opt/OV/bin/ovdwunloader,
archive it, and recreate the solid.db. To check whether the solid
database has corrupted, run the following commands in order:
Ovstop ovdbrun
/opt/OV/bin/ovdbrun -x testindex
If you get some internal error, it's most likely that the database
is corrupt. If the solid database has become corrupted, it can be
re-initialized using the following procedure:
1. Keep a copy of the existing database and all associated files
under /var/opt/OV/share/databases/analysis/default/ in a different
file system just in case you need to roll back.
2. Change the working directory to /var/opt/OV/share/databases/analysis/default/.
3. Delete solid.db, ./sol*.log, and ./log/*, ./backup/* files.
4. Run /opt/OV/bin/ovdbrun -x exit while in the /var/opt/OV/share/databases/analysis/default
directory. You will be prompted for the default database. Give the
following values for the variables system catalog=ovdb, user=ovdb,
and passwords=ovdb. This creates an empty database (solid.db).
5. You can populate the database with the NNM schema:
/opt/OV/bin/ovdwconfig.ovpl -type embedded -load
6. You can start the NNM server with the newly configured database
with ovstart ovdbcheck.
Performance Enhancing Scripts
It is good practice to do a regular cleanup of the OpenView operational
databases. This can be achieved using the following procedure:
/opt/OV/bin/ovstop netmon
xnmsnmpconf -clearCache
ovw -mapcount -ruvDR
ovtopofix -a
/opt/OV/bin/ovstart netmon
You can perform a regular weekly backup using the following cron job:
15 15 * * 5 /opt/OV/bin/ovbackup.ovpl -d /filesystem > /dev/null 2>&1
The following cron jobs can be used to trim the old data before exporting
it to the database to improve the solid database-related performance
issues:
50 23 * * * /opt/OV/bin/ovdwtopo -export
15 23 * * * /opt/OV/bin/ovdwevent -export -trimdetail 14
15 2,5,8,11,14,17,20 * * * /opt/OV/bin/ovdwevent -export
35 23 * * * /opt/OV/bin/ovdwtrend -export -sum -trim -trimpriorto 236
35 2,5,8,11,14,17,20 * * * /opt/OV/bin/ovdwtrend -export
0 1 * * * ovdwtrend -delpriorto "2002-06-31 00:00:00" -exportto reduced
Further Reading
Performance tuning is not a one-day job and has to be analyzed,
tuned, and verified over a period of time to get it right. I hope
I have provided initial tips covering the various factors affecting
NNM performance and possible workarounds to overcome them. For further
information, refer to the following sources:
1. John Blommers, OpenView Network Node Manager: Designing
and Implementing an Enterprise Solution, ISBN 0-13-019849-8
2. Network Node Manager 6.2 Performance and Configuration Guide
3. Reporting and Data Analysis with HP OpenView Network Node Manager
4. Network Node Manager 6.2 DNS Performance Improvements
5. HP OpenView -- A guide to Scalability and Distribution
for Network Node Manager
6. Network Node Manager -- Managing Your Network
Thirumalainambi Murugesh received his Ph.D. degree in Electrical
& Electronic Engineering specializing Managing Networks and
Internet Security from the University of Auckland, New Zealand.
He has been working in the IT industry during the past 10 years
in design, implementation, and support of high-performance Unix
computing systems and networks and focusing on reliability, redundancy,
and security. He can be reached at: [email protected].
|